Best Christmas Decor Ideas for 2025

I’ve been hunting for fresh Christmas decor ideas for 2025 that won’t drain my savings account, and I’m excited to share what I’ve discovered. This guide is perfect for homeowners, renters, and anyone who wants their space to feel magical during the holidays without the hefty price tag.
I’ll walk you through trending color schemes that actually save you money by using what you already own, plus show you how to transform your living room into a cozy Christmas haven on a tight budget. You’ll also discover my favorite DIY tricks using everyday household items – I’m talking about turning old sweaters into stockings and mason jars into stunning centerpieces.
My goal is simple: help you create a home that feels warm, festive, and completely yours this Christmas season. Ready to make some holiday magic happen?
Trending Christmas Color Schemes That Save Money
Warm Neutrals with Gold Accents for Timeless Appeal
I’ve discovered that warm neutral Christmas palettes offer the best bang for your buck because they work seamlessly with your existing home decor. My go-to combination includes creamy whites, soft beiges, and warm grays paired with gold accents that catch the light beautifully. This scheme works year after year, making it one of the most cost-effective christmas decor ideas 2025 has to offer.
When I’m shopping for this look, I focus on affordable gold spray paint to transform dollar store ornaments, picture frames, and even pinecones I collect from my yard. I’ve turned plain glass vases into stunning centerpieces by adding a light coat of gold paint and filling them with battery-operated fairy lights. The warm neutral base means I can use my existing throw pillows, blankets, and furniture without buying new pieces.
My favorite budget hack involves using different textures in the same neutral family. I layer cream-colored burlap table runners with white linen napkins and add gold ribbon tied around my dining chairs. The varying textures create visual interest without requiring expensive decorative items. I’ve also found that mixing metallics works beautifully – combining gold with warm brass or copper elements adds depth without breaking the theme.
Deep Forest Greens with Natural Wood Elements
Forest green has become my signature Christmas color because it feels both traditional and fresh. I love how it pairs effortlessly with natural wood tones I already have in my home. This color scheme saves money because you can incorporate real greenery from your yard or local park – think pine branches, holly, and eucalyptus.
My secret weapon is using different shades of green together. I mix deep emerald velvet ribbon with sage green glass ornaments and natural evergreen branches. The varying tones create a rich, layered look that appears expensive but costs very little. I’ve decorated entire mantels using only branches I pruned from my own shrubs, combined with pinecones and simple wooden ornaments from craft stores.
For budget-friendly wood elements, I scout thrift stores for wooden serving trays, candlesticks, and picture frames. A quick sanding and natural wood stain transforms these pieces into beautiful Christmas decor. I also collect interesting branches and driftwood throughout the year to use as natural sculptural elements during the holidays.
Blush Pink and Copper for Modern Elegance
This unexpected color combination has stolen my heart because it feels sophisticated yet approachable. I started using blush pink in my Christmas decor when I realized how beautifully it complements the copper pots I use in my kitchen year-round. The soft pink adds warmth without being overwhelming, while copper brings that metallic glamour everyone craves.
My approach involves mixing different textures and finishes. I use matte blush pink ornaments alongside shiny copper ones, and I’ve found that dusty rose velvet ribbon paired with copper wire creates stunning bow accents. The best part? This palette works beautifully with white lights, which are typically less expensive than colored LED options.
I create this look affordably by spray-painting existing ornaments and decorations. Copper spray paint transforms old glass baubles, picture frames, and even mason jars into elegant decor pieces. For the pink elements, I shop end-of-season sales from the previous year and repurpose items like pink candles, fabric flowers, and even children’s toys in the right shade.
Classic Red and White with Fresh Updates
Red and white remains unbeatable for Christmas, but I’ve learned to make it feel current and budget-friendly. My approach focuses on varying the shades and textures rather than buying all-new decorations. I mix cherry red with burgundy and add touches of coral to keep the palette from feeling flat.
I refresh this classic scheme by incorporating modern elements like geometric patterns and clean lines. Instead of traditional floral patterns, I look for red and white striped ribbons, polka-dotted ornaments, and simple solid-colored pieces. This approach allows me to shop sales throughout the year since red and white decorations are commonly available.
My money-saving strategy involves using red and white items I already own in new ways. I repurpose red kitchen towels as table runners, use white serving dishes as decorative displays, and even incorporate red books from my shelves into my Christmas vignettes. This color scheme also photographs beautifully, making it perfect for creating those Instagram-worthy moments without the designer price tag.
Cozy Living Room Christmas Transformations on a Budget
Layer Textiles for Instant Holiday Warmth
I’ve discovered that swapping out my everyday textiles is the fastest way to transform my living room into a Christmas wonderland without spending much. My go-to strategy starts with throw pillows – I hunt for holiday-themed covers at discount stores or make my own using festive fabric scraps. Red velvet, green plaid, or cream with gold accents instantly change the entire mood of my space.
My couch becomes the star of my christmas decor ideas 2025 when I drape a chunky knit throw over one arm and add a faux fur blanket across the back. I’ve found that mixing textures creates that expensive, designer look for a fraction of the cost. My favorite combination includes a cable-knit throw in cream, a velvet pillow in deep burgundy, and a small accent pillow with subtle gold threading.
I always swap my regular curtains for heavier, warmer-looking panels during December. If buying new curtains isn’t in my budget, I clip festive ribbon or garland to my existing ones. My dining room chairs get holiday slipcovers or simple fabric ties in seasonal colors. Even my coffee table gets the textile treatment – I use a vintage-style table runner in rich burgundy or forest green.
The key is layering different textures and weights. I might combine cotton, wool, velvet, and faux fur all in one room, but I stick to a cohesive color palette to keep everything looking intentional rather than chaotic.
Create Focal Points with Affordable Statement Pieces
Every room needs a wow factor, and I’ve learned to create mine using budget-friendly statement pieces that pack maximum visual impact. My biggest success story involves creating a stunning winter mantel display using items from the dollar store and my own yard. I gather pinecones, spray paint them gold, and arrange them alongside battery-operated string lights in glass jars.
My coffee table becomes a focal point with a large wooden tray filled with pillar candles of varying heights, fresh greenery clippings, and a few ornaments scattered artfully around. I spent less than $15 on this centerpiece, but guests always ask where I bought such a beautiful arrangement.
For wall impact, I create my own oversized wreath using a foam base, ribbon, and artificial greenery. I make it extra special by adding battery-powered LED lights woven throughout. This becomes my living room’s main focal point and costs about 70% less than buying a pre-made designer version.
My favorite trick involves grouping three large glass vases of different heights and filling them with different seasonal elements – one with ornaments, one with pinecones, and one with string lights. The varied heights create visual interest, and the repetition of glass ties everything together.
Transform Existing Furniture with Holiday Covers
I refuse to buy new furniture just for Christmas, so I’ve mastered the art of disguising what I already own. My ottoman gets a complete makeover with a festive throw that I tuck and pin underneath – suddenly it looks like expensive holiday furniture. I use safety pins on the underside to keep everything secure and smooth.
My dining room chairs become instant holiday seating with simple chair back covers made from red or green fabric. I don’t even sew these – I just cut rectangles of fabric and tie them on with ribbon. The transformation is remarkable, and my guests never suspect these are just fabric scraps.
For my side tables and end tables, I use festive tablecloths cut to size. I layer a smaller lace doily on top for texture and vintage charm. My bookshelf gets the holiday treatment with fabric draped between some shelves, creating cozy nooks for displaying ornaments and small decorations.
I’ve even transformed my TV stand by draping it with a garland and adding a few strategically placed candles. The key is making sure safety comes first – I only use battery-operated candles near electronics and always secure loose fabric away from heat sources.
DIY Christmas Decorations Using Household Items
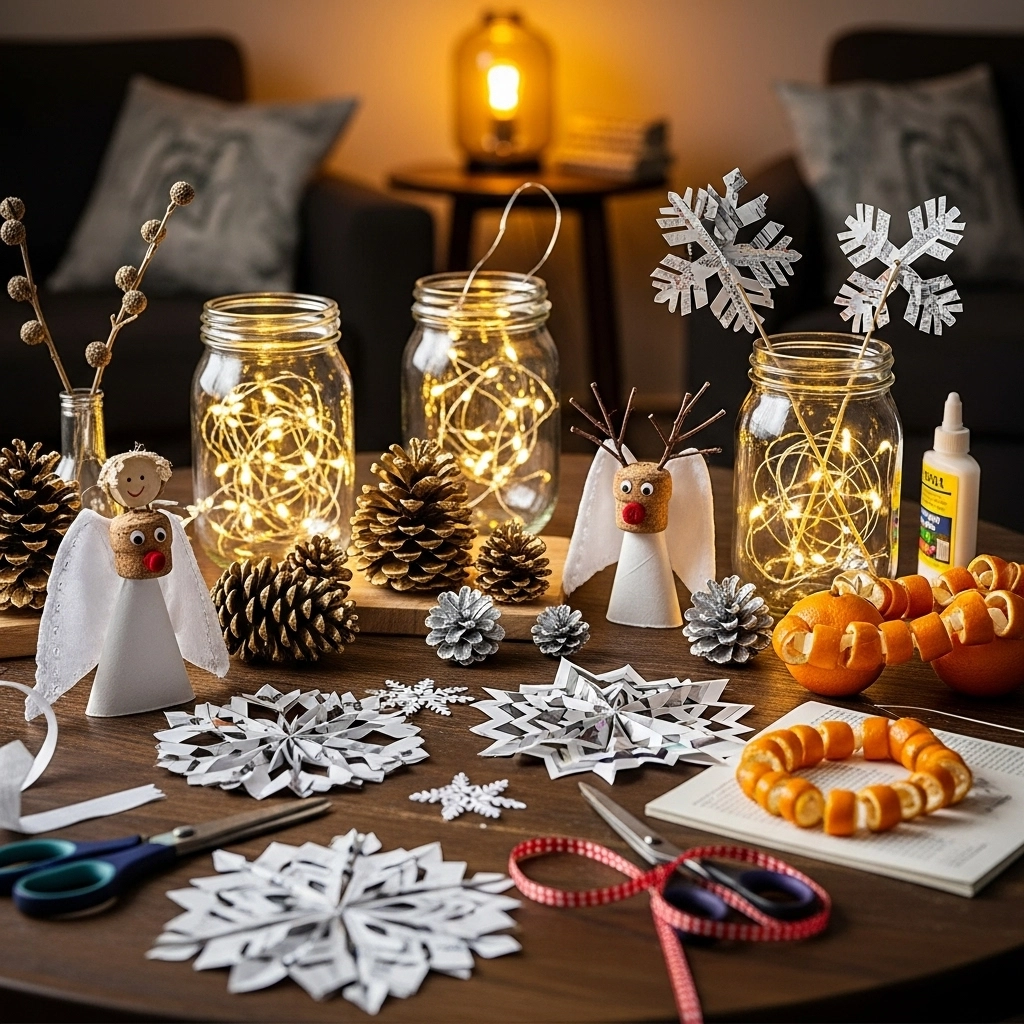
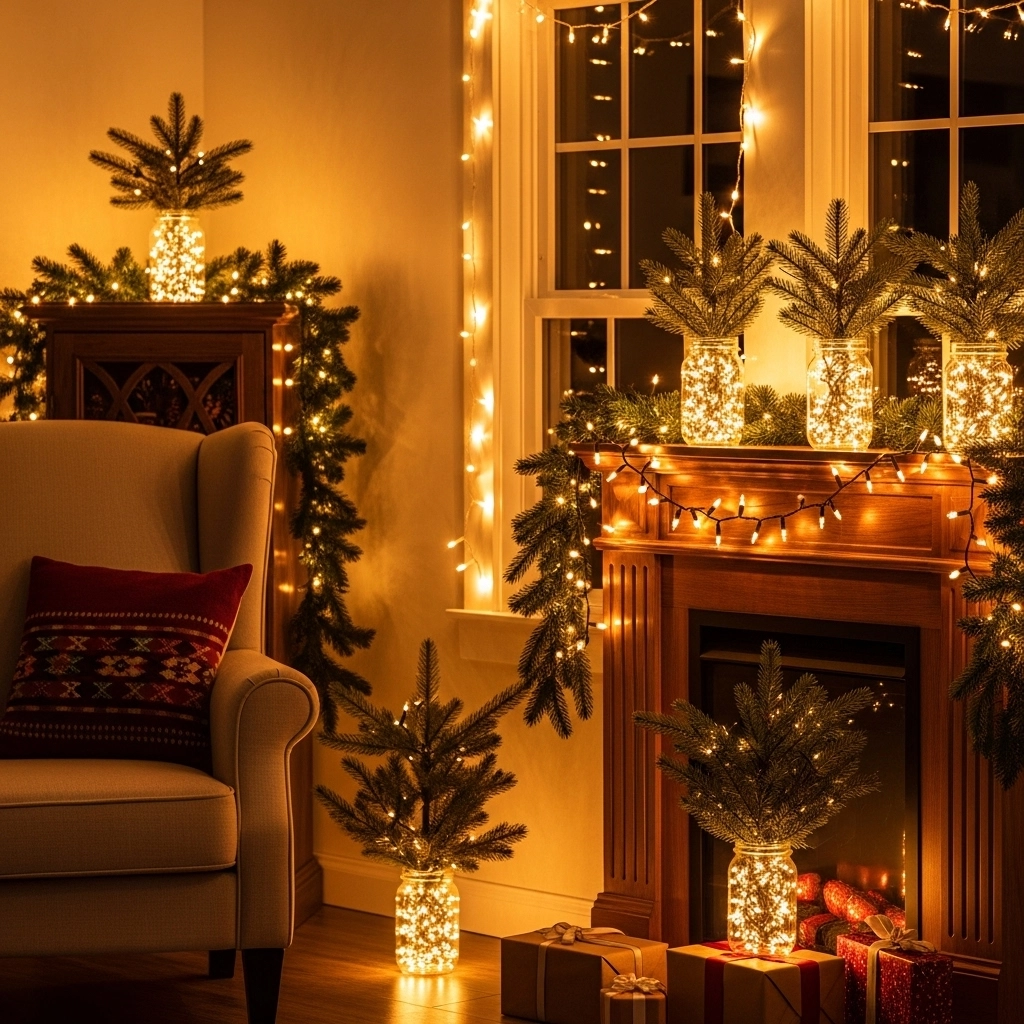
Mason Jar Snow Globe Centerpieces
I absolutely love creating these charming snow globe centerpieces because they look expensive but cost practically nothing to make. All I need are mason jars from my kitchen, some glycerin (baby oil works too), glitter, and small figurines or branches from my yard.
My process starts by filling the jar about three-quarters full with water, adding a tablespoon of glycerin to make the “snow” fall slowly, then sprinkling in white or silver glitter. For the scene inside, I’ve used everything from small plastic Christmas trees to miniature deer figurines I picked up at the dollar store. Pine sprigs and small ornaments work beautifully too.
The secret I’ve discovered is waterproofing any non-plastic items with clear nail polish before placing them in the water. I also flip the jar upside down, so the lid becomes the base where I glue my decorations. This creates a more stable foundation and prevents floating objects.
These mason jar snow globes make perfect centerpieces when I group three different sizes together on my dining table. I’ve even made tiny versions using baby food jars for individual place settings.
Paper Bag Christmas Trees for Any Space
Paper bag Christmas trees have become my go-to decoration when I need impact without spending money. I use brown paper lunch bags, newspaper, or even old wrapping paper to create these dimensional trees that work in any corner of my home.
My technique involves cutting the bags into a tree shape, then folding and scrunching them to create texture. I stack multiple bags of decreasing sizes to build height and fullness. The beauty of this project is that no two trees look identical – each one has its own personality.
For finishing touches, I brush on white paint for a snowy effect or sprinkle with glitter while the paint is still wet. Sometimes I punch holes and string battery-operated fairy lights through them for a magical glow. These trees look stunning grouped together on my mantel or scattered around the living room.
I’ve found that newspaper creates an interesting vintage look, while brown paper bags give a more rustic, farmhouse feel. The best part is that I can make them as tall or short as needed to fit different spaces.
Wine Cork Ornament Crafts
My collection of wine corks finally found their perfect purpose in christmas decor ideas 2025. I transform these everyday items into adorable ornaments that add character to my tree without any expense.
My favorite wine cork project is creating mini snowmen by gluing three corks together vertically, then painting them white and adding tiny fabric scraps for scarves. I use black permanent marker for the coal buttons and carrot-colored marker for noses. These little guys are incredibly charming hanging from tree branches.
I also slice corks horizontally to create small round discs that become the base for miniature wreaths. I glue tiny artificial greenery around the edge and add a small red bow. When I don’t have artificial greenery, I use green marker to color small paper leaves.
Another technique I love is drilling small holes through whole corks to create rustic bead garland. I string them with cranberries and popcorn for a natural, farmhouse-style decoration that drapes beautifully around doorways or along the mantel.
Fabric Scrap Garland Projects
Fabric scrap garlands solve my gift-wrapping leftover problem while creating cozy decorations throughout my house. I save fabric scraps, old clothing pieces, and even worn-out sheets throughout the year specifically for these projects.
My process involves cutting fabric into strips about 6 inches long and 1 inch wide, then tying them onto a length of twine or yarn. I vary the colors and textures – mixing plaids with solids, cotton with felt, and different shades of reds, greens, and whites.
The rustic, shabby-chic look these garlands create works perfectly with my cozy Christmas aesthetic. I drape them along staircases, around doorframes, or across the fireplace mantel. They add softness and warmth that store-bought decorations can’t match.
What I particularly enjoy is how each garland tells a story – pieces from my daughter’s old pajamas, fabric from a favorite shirt, or scraps from home sewing projects. These personal touches make my Christmas decorations meaningful beyond their visual appeal.
Repurposed Book Page Holiday Art
Old books destined for the recycling bin become stunning wall art in my home during the holidays. I carefully remove pages from damaged books and transform them into sophisticated decorations that look professionally made.
My most successful project involves folding book pages into Christmas tree shapes and mounting them in thrift store frames. I create different sizes and arrange them in groupings on my walls. Sometimes I lightly brush the pages with green watercolor or leave them natural for a vintage look.
I also cut book pages into ornament shapes – stars, angels, trees – and string them together to create literary garland. The text adds visual interest and creates beautiful shadows when hung near windows. For extra elegance, I outline the shapes with gold or silver marker.
Another technique I’ve mastered is rolling book pages into tight spirals and gluing them together to form rosettes or flowers. These dimensional pieces look incredible when mounted on canvas or used as tree toppers. The neutral colors blend with any color scheme while adding sophisticated texture to my holiday displays.
Budget-Friendly Christmas Lighting Solutions
String Light Magic for Every Room
I’ve discovered that string lights are hands down the most versatile and affordable way to transform any space into a Christmas wonderland. My favorite trick is layering different types of string lights throughout each room to create depth and warmth without spending a fortune.
In my living room, I wrap warm white LED string lights around my existing curtain rods – it creates this gorgeous soft glow that makes the whole room feel cozy. The best part? I can leave them up all winter long since they don’t scream “Christmas” once the holidays are over. I also drape battery-operated fairy lights behind my couch or along my bookshelf. These tiny lights create beautiful ambient lighting that makes everything feel magical.
My bedroom gets the twinkle treatment too. I string lights around my headboard or create a simple backdrop by hanging them in gentle swags across one wall. The key is using a dimmer switch or choosing lights with multiple brightness settings – this way I can adjust the mood from bright and cheerful during the day to soft and romantic at night.
For my kids’ rooms, I’ve found that string lights shaped like stars, snowflakes, or even simple geometric patterns work wonders. I secure them with clear adhesive hooks that won’t damage the walls – perfect for renters like me who need to be careful about deposits.
The dining room becomes instantly festive when I wrap string lights around my existing light fixture or create a simple chandelier effect by gathering several strands in the center of the room. I’ve also strung lights along my dining room hutch, weaving them between dishes and decorative items I already own.
Battery-Operated Options for Renters
Being a renter myself, I’ve learned that battery-operated Christmas lights are absolute lifesavers. They give me complete freedom to decorate anywhere without worrying about outlet locations or getting permission to install new electrical fixtures.
My go-to battery-operated lights are the LED copper wire varieties – they’re incredibly flexible and almost invisible during the day. I use them to create wreaths on my front door, wind them through my houseplants, and even stuff them inside glass jars to make instant luminaries. The battery packs are small enough to hide behind furniture or tape under tables.
I’ve invested in rechargeable battery packs for my most-used light strings. While the initial cost is slightly higher, I save money long-term by not constantly buying disposable batteries. Some of my newer sets even come with timers, so they automatically turn on at sunset and off after six hours – perfect for lazy evenings when I forget to manually switch them on.
For my apartment balcony, battery-operated lights are the only option since I don’t have outdoor outlets. I wrap them around my balcony railing and hang them from my small potted plants. Since there’s no cord to worry about, I can arrange them exactly how I want without being limited by outlet placement.
One trick I’ve mastered is using battery-operated spotlights to highlight specific decorations. I point them at my Christmas cards displayed on the wall, or use them to create dramatic shadows with my small decorative trees. These focused lights create professional-looking displays that rival anything you’d see in expensive stores.
Solar-Powered Outdoor Display Ideas
Solar-powered Christmas lights have become my outdoor decoration game-changer, especially since my electricity bill tends to spike during the holidays. I’ve learned that investing in quality solar lights pays off because they work reliably throughout the winter months, even on cloudy days.
My front yard features solar-powered icicle lights along the roofline and pathway lights leading to my front door. I strategically place the solar panels in spots that get the most daylight – usually on south-facing surfaces or areas that aren’t blocked by trees or buildings. The panels are surprisingly small and blend in well with my existing outdoor decor.
I’ve created a stunning backyard display using solar-powered string lights wrapped around my fence and small trees. The secret is choosing lights with larger battery capacity – they store more power during short winter days and keep glowing longer into the night. My current favorites run for up to 8 hours after a full day of charging.
For my garden beds, I use solar-powered stake lights shaped like snowflakes and stars. They charge during the day and automatically illuminate at dusk, creating beautiful patterns across my landscaping. I also have solar-powered net lights that I drape over my bushes – they look like they’re covered in twinkling snow.
My latest discovery is solar-powered projection lights that cast moving snowflakes or holiday patterns onto my house exterior. They’re weatherproof and create an impressive display that neighbors always compliment. The best part is watching my electricity bill stay reasonable while my house looks like something from a holiday movie.
Easy Christmas Mantel Styling Without Breaking the Bank
Natural Elements Gathered from Your Yard
I’ve discovered that my yard is basically a free Christmas decoration goldmine waiting to be explored. Every fall, I make it a habit to gather pinecones before they get buried under snow. I store them in a basket in my garage, and come December, they become my go-to mantel fillers. Pine branches are another treasure – I clip a few from the back of my evergreen trees where it won’t show, and they instantly bring that fresh Christmas scent indoors.
My favorite trick involves collecting different textures and sizes. I look for interesting twigs, especially birch branches if I can find them, along with dried seed pods and even attractive weeds that have interesting shapes. I’ve learned to gather these natural elements throughout the year – dried hydrangeas from summer, interesting branches from spring pruning, and colorful leaves that I press between books.
The key is variety. I mix smooth river rocks I’ve collected with rough bark pieces, creating visual interest without spending a dime. Even bare branches can look stunning when arranged properly. I often spray-paint some of my collected items in metallic colors – gold or silver pinecones mixed with natural ones create depth and catch the light beautifully.
Thrift Store Finds Transformed into Holiday Gold
My local thrift stores have become my secret weapon for mantel styling. I hunt for interesting vessels – old brass candlesticks, vintage bowls, or unique vases that can hold my natural elements. The patina and character of these pieces add so much more personality than anything I could buy new.
I’ve found that books are incredible mantel decorations. I stack vintage hardcovers to create different heights, and sometimes I’ll wrap a few in brown paper or sheet music for a custom look. Old picture frames become stunning when I remove the glass and back them with festive paper or fabric scraps.
My biggest discovery was realizing that almost any object can become “Christmas-y” with the right treatment. I’ve turned old silver serving pieces into candle holders, transformed vintage mason jars into snow globes using Epsom salt, and even used old wooden boxes as risers to create levels on my mantel.
The transformation happens with spray paint, ribbon, or simple cleaning. That tarnished silver tray I bought for two dollars became gorgeous after a gentle polish, and now it holds my candle collection beautifully.
Layering Techniques for Professional Results
I’ve learned that successful mantel styling is all about creating layers and varying heights. I start with my largest pieces first – maybe a mirror or artwork as my anchor point. Then I build around it using the “triangle rule” where I place items in groups of odd numbers.
My layering strategy involves three levels: background, middle ground, and foreground. In the back, I might lean a large piece of art or a mirror. The middle layer includes medium-height items like candlesticks or small plants. The front layer consists of smaller objects that can spill slightly over the mantel edge.
I create depth by overlapping items slightly and varying the distances between pieces. I’ve discovered that pushing some items toward the back and pulling others forward makes everything look more intentional and professionally arranged. Books become perfect risers for creating different elevations without buying expensive display stands.
Color repetition ties everything together. I pick two or three colors and repeat them throughout the display in different textures and sizes. This creates cohesion even when using completely different types of objects.
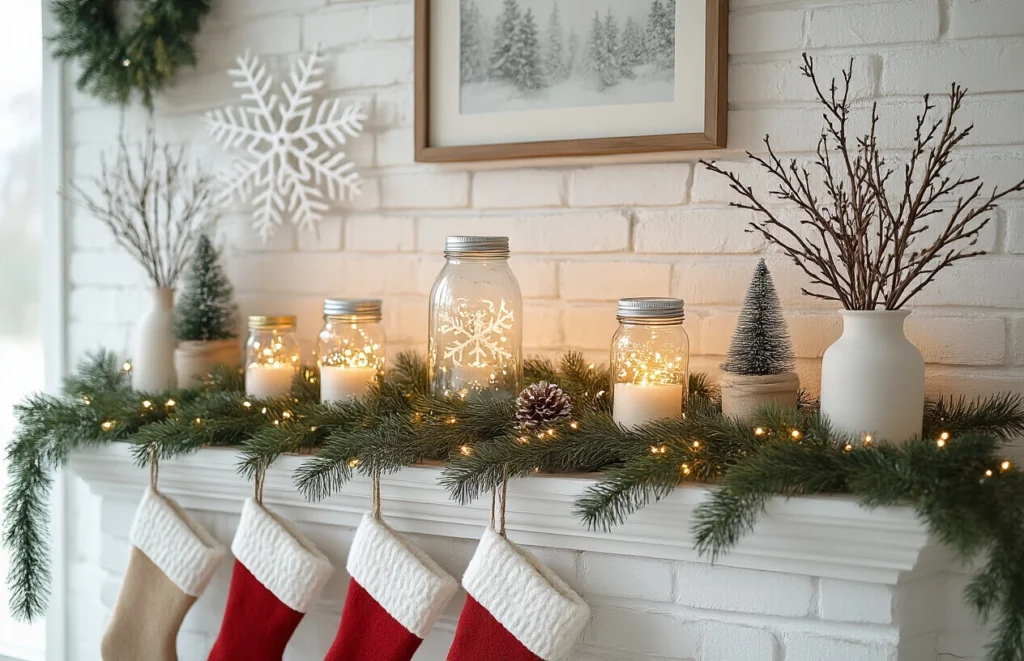
Candle Arrangements That Create Ambiance
Candles are my secret to making any mantel feel magical and cozy. I’ve learned that mixing candle heights and styles creates much more visual interest than matching sets. I combine tall taper candles with medium pillar candles and small votives to create a rhythm across my mantel.
Safety comes first, so I always ensure there’s adequate clearance above each flame and never leave candles unattended. I use my collected natural elements as bases – placing pillar candles on wooden slices or surrounding them with pinecones creates beautiful, organic displays.
My favorite budget trick involves using different containers as candle holders. Old teacups become charming votive holders, while mason jars can house battery-operated fairy lights for a similar glow without the fire risk. I’ve even used hollowed-out small pumpkins or gourds as unique candle vessels.
For Christmas decor ideas 2025, I’m seeing a trend toward warm, golden candlelight mixed with cooler elements like silver or white accessories. This combination creates depth and prevents the display from looking flat or one-dimensional. The flickering light brings everything together and makes even the simplest arrangement look expensive and thoughtfully curated.
Quick Christmas Kitchen and Dining Room Updates
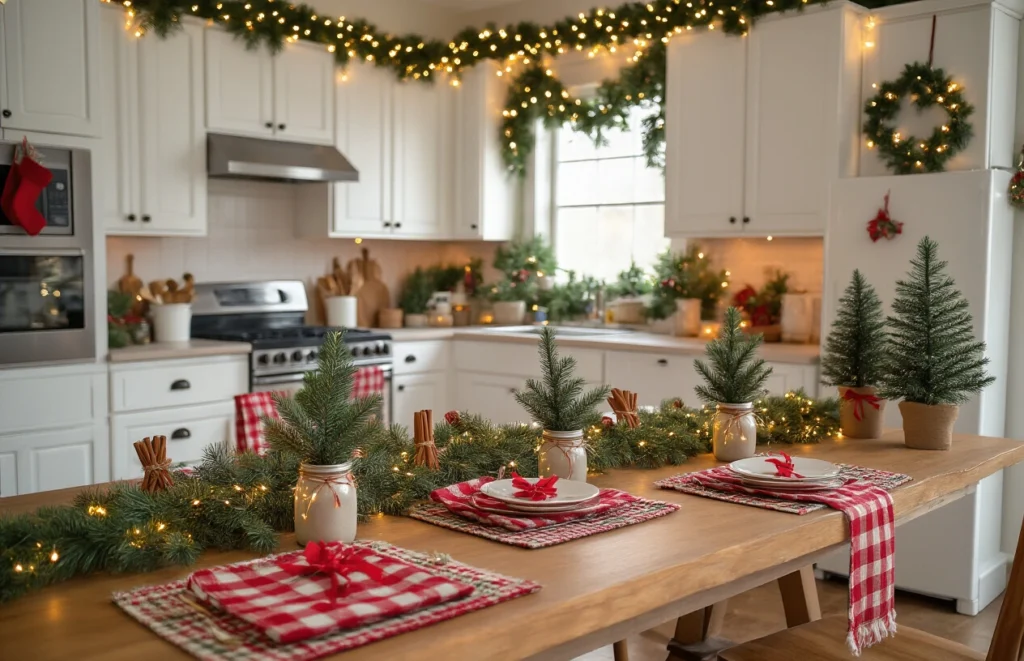
Holiday Table Settings Using Everyday Dishes
I’ve discovered that creating magical Christmas table settings doesn’t require expensive china or specialty dishware. My favorite approach involves transforming ordinary plates and glasses into festive masterpieces with clever styling tricks.
My go-to method starts with layering different textures. I place a simple burlap runner down the center of my table, then arrange my regular white dinner plates on top of charger plates – even paper ones work beautifully when they’re in rich burgundy or forest green. The key is mixing heights and materials to create visual interest.
For napkin presentation, I fold my everyday cloth napkins into Christmas trees or simple pockets that hold sprigs of rosemary or cinnamon sticks. These natural elements instantly elevate the setting while adding wonderful aromas. When I don’t have cloth napkins, I’ve even used brown kraft paper as placemats and drawn holly leaves with green markers – my kids love helping with this creative touch.
Glass elements make the biggest impact in my experience. I fill mason jars or regular drinking glasses with battery-operated string lights, cranberries, or pinecones collected from my yard. These become instant conversation pieces that cast beautiful shadows across the table. Wine glasses get a festive twist when I tie small ornaments to the stems with ribbon.
Festive Kitchen Towel and Apron Displays
My kitchen becomes part of the Christmas decor ideas 2025 showcase through strategic towel and apron arrangements that cost practically nothing but deliver maximum seasonal charm.
I’ve learned that hanging kitchen towels in creative ways transforms the entire cooking space. Instead of simply draping them over oven handles, I create small garlands by clipping festive dish towels to twine with mini clothespins. This works especially well above my sink window or along open shelving.
My collection of aprons becomes wall art during the holidays. I hang vintage-style or Christmas-themed aprons on decorative hooks near my stove, treating them like textile decorations. Even plain aprons get the holiday treatment when I pin small felt snowflakes or holly leaves to the pockets.
For towel displays, I roll different colored kitchen towels and arrange them in baskets with cinnamon sticks tucked between the rolls. The warm spice scent fills my kitchen naturally, and the rolled towels look like they belong in a high-end home store.
I also create “towel trees” by stacking different sized towels in Christmas colors and securing them with a decorative ribbon. These sit beautifully on countertops and provide both function and festive flair.
Edible Centerpieces That Double as Dessert
Creating centerpieces that guests can actually eat solves two problems at once – decoration and dessert. My most successful edible arrangements have become family traditions that everyone looks forward to each year.
My signature gingerbread house centerpiece serves 8-10 people when deconstructed after dinner. I build it on a wooden cutting board so it’s easy to disassemble and share. Around the base, I arrange different types of Christmas cookies in glass bowls, creating height variations that make the display more dynamic.
Fruit arrangements work beautifully for holiday tables. I create “Christmas trees” using styrofoam cones covered in green grapes, with cherry tomatoes as ornaments and a yellow bell pepper star on top. For dessert versions, I use green frosted cupcakes stacked in tree formation with candy decorations.
My chocolate fountain setup doubles as both entertainment and centerpiece. I surround the fountain with arranged fruits, marshmallows, and cookies for dipping. The warm glow and interactive element make it the focal point of any holiday gathering.
Candy cane forest displays work wonderfully too. I stick candy canes into floral foam hidden inside decorative containers, creating “trees” at different heights. Between them, I place small bowls of chocolate truffles and peppermint bark pieces that guests can nibble throughout the meal.
Outdoor Christmas Decor That Withstands Winter Weather
Weatherproof DIY Wreath Projects
Creating outdoor wreaths that survive winter storms has become my specialty after countless failed attempts with flimsy materials. My go-to base now consists of grapevine wreaths, which naturally resist moisture and hold their shape through temperature changes. I’ve learned to skip the traditional wire frames that rust and warp.
For lasting greenery, I rely on artificial cedar and pine branches mixed with real pinecones I collect during autumn walks. The trick lies in securing everything with zip ties instead of floral wire – they won’t corrode and actually get tighter in cold weather. I always test my attachments by giving each element a firm tug before hanging.
My favorite weatherproof decoration involves creating berry clusters using red outdoor Christmas balls wired together. They look exactly like winterberries but won’t shrivel or attract birds. I also incorporate burlap ribbon, which develops a beautiful weathered patina rather than falling apart like satin alternatives.
The secret weapon for winter durability is a light coating of clear outdoor acrylic sealer on any natural elements. I learned this after watching my first wreath disintegrate during a January ice storm. Now my wreaths maintain their color and texture through multiple freeze-thaw cycles.
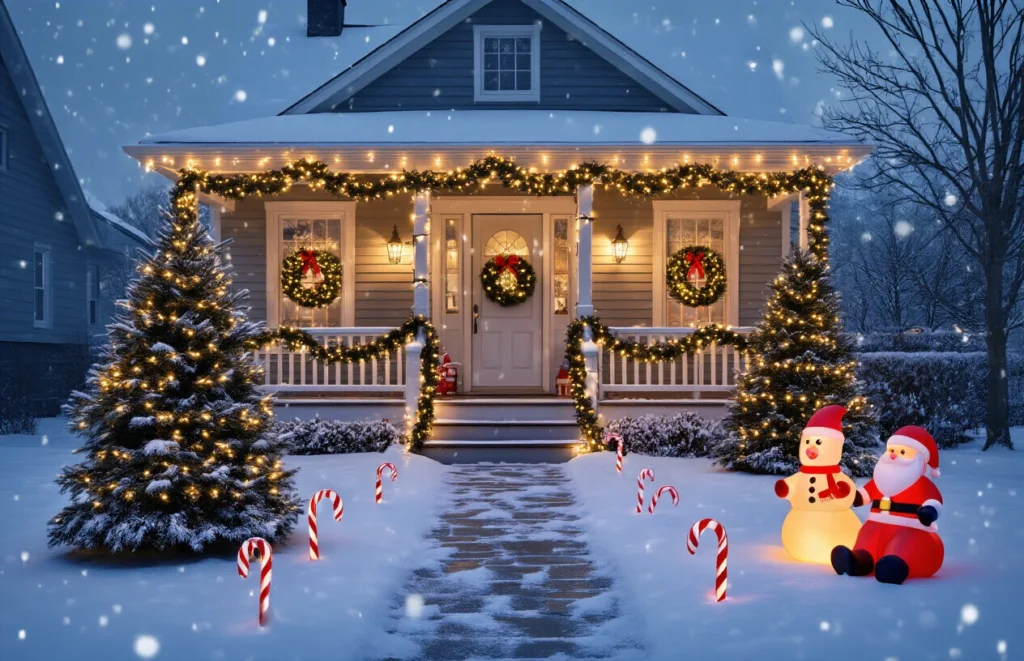
Budget Porch and Entryway Styling
My porch transformation happens with items I already own, plus strategic purchases from discount stores. Large galvanized buckets filled with evergreen branches create instant impact for under $15 each. I hunt down free greenery from tree lots – they’re usually happy to give away bottom branches they trim off fresh trees.
Layering different heights makes my small porch feel grand. I stack wooden crates (thrift store finds at $3 each) to create levels, then top them with battery-operated lanterns and mason jar snow globes I make myself using glycerin and glitter.
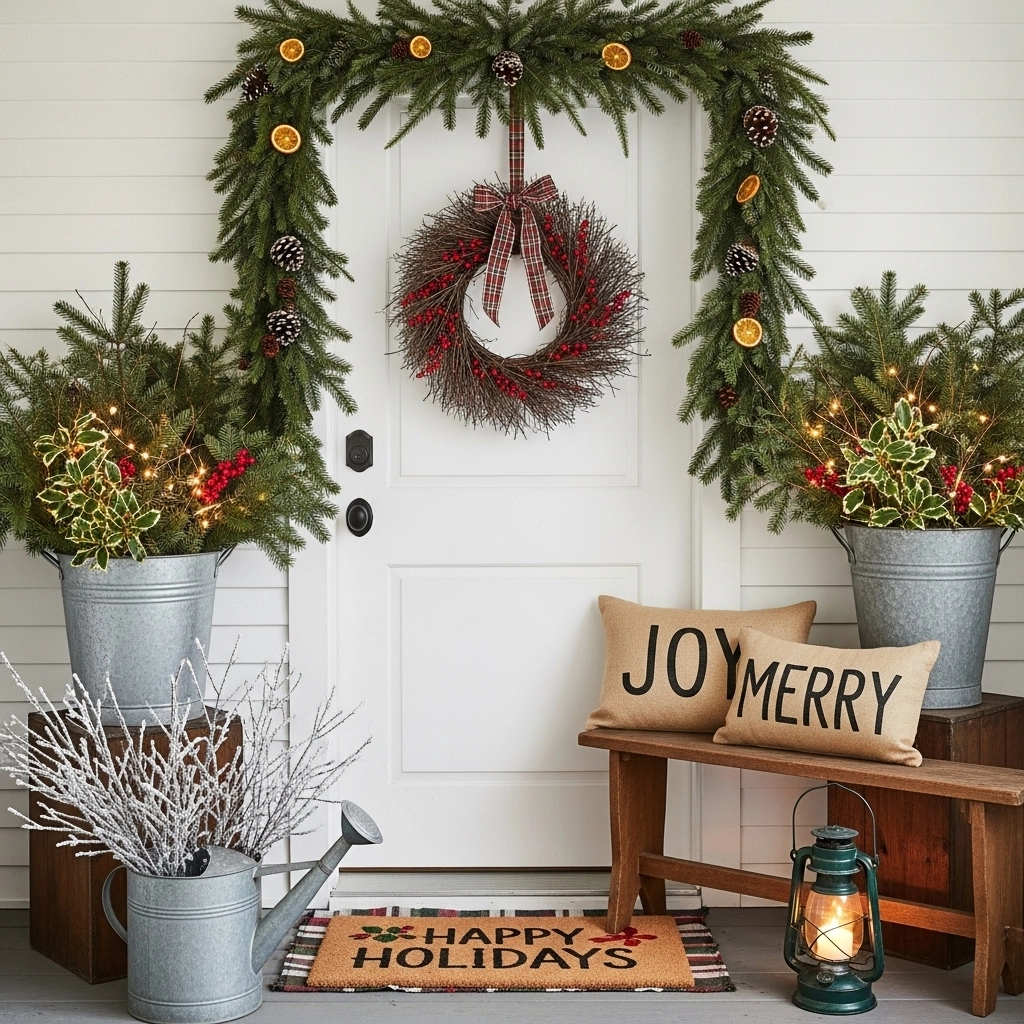
My entryway gets the royal treatment with a $12 garland from the grocery store, enhanced with pinecones sprayed with metallic paint. I learned to anchor everything to prevent wind damage – shepherd’s hooks driven into large planters work perfectly and cost less than permanent installations.
String lights woven through railings multiply my decorating impact without multiplying costs. I buy warm white LED strings after Christmas at 75% off and store them for next year. Solar pathway stakes relocated to porch planters create magical evening ambiance without electrical work.
Natural Winter Container Gardens
Building winter containers that actually thrive requires understanding which plants laugh at freezing temperatures. My containers now feature kale, winter pansies, and evergreen boughs that get more beautiful as temperatures drop. Purple cabbage becomes absolutely stunning with frost highlighting its edges.
I’ve discovered that wide, shallow containers work better than tall narrow ones because they resist cracking from freeze-thaw cycles. Terra cotta looks beautiful but splits apart in cold weather, so I invest in fiberglass containers that mimic expensive materials at half the price.
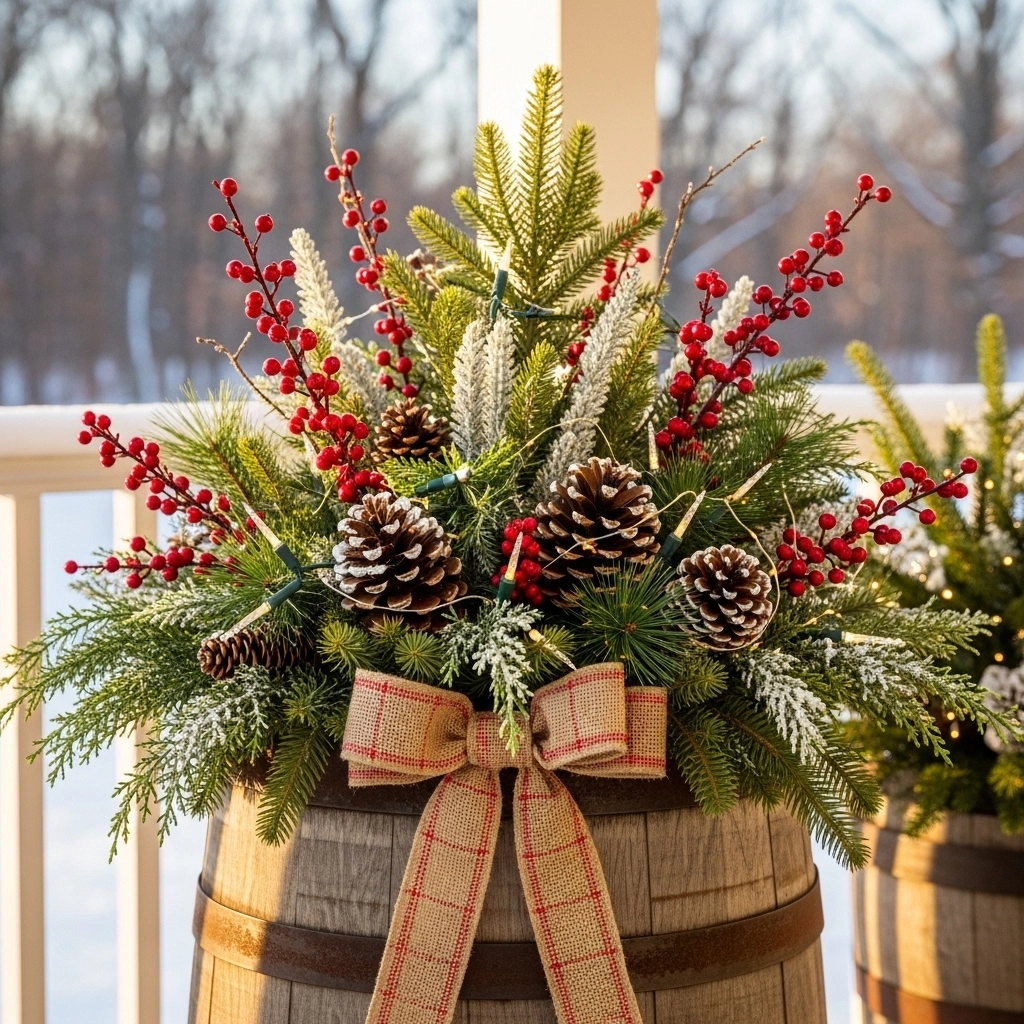
My layering technique starts with small evergreen trees or shrubs as anchors, then adds trailing ivy that stays green all winter. White cyclamen provide pops of color that intensify rather than fade in cold weather. Birch branches stuck into containers add height and winter interest without ongoing plant care.
The drainage secret involves adding a layer of gravel, then using potting soil mixed with perlite for better water movement. I learned this prevents the solid ice blocks that kill container plants. A layer of decorative mulch on top prevents soil from splashing during winter rains.
Solar Light Pathway Decorations
Solar lighting has revolutionized my outdoor christmas decor ideas 2025 approach because it requires zero electrical knowledge or ongoing energy costs. My pathway now features solar stake lights disguised inside mason jars painted with frosted glass spray. Each light costs under $3 and creates a warm, welcoming glow.
I’ve learned to upgrade the batteries in solar lights immediately after purchase. The cheap batteries rarely last through winter, but replacing them with high-quality rechargeable batteries extends their life dramatically. I also clean the solar panels monthly with glass cleaner – dirty panels mean dim lights.
My favorite hack involves creating light clusters using multiple small solar lights grouped in large planters. I camouflage the plastic stakes with artificial snow and surround them with winter greenery. The effect looks like professional lighting design but costs a fraction of hardwired alternatives.
For extended winter nights, I supplement solar lights with battery-operated string lights hidden inside garlands. Timer functions let me control exactly when lights activate, and I never worry about increased electricity bills or complicated installation requirements.

Looking back at all these decoration ideas, I’ve realized that creating a magical Christmas atmosphere doesn’t require emptying your wallet or spending weeks on complicated projects. The trending color schemes I’ve shared can transform any space when you stick to just two or three complementary shades, and those DIY projects using items you already have at home prove that creativity beats costly store-bought decorations every time.
My biggest takeaway from exploring these budget-friendly approaches is that the most memorable Christmas decor comes from personal touches and cozy elements rather than expensive showpieces. Whether you’re wrapping string lights around mason jars, creating a stunning mantel display with natural elements from your backyard, or adding festive touches to your kitchen with simple swaps, these small changes add up to create that warm, inviting holiday feeling we all crave. Start with one room this weekend, grab some supplies you already own, and let your creativity guide you – your home will feel like a Christmas wonderland without the hefty price tag.
If you’re looking for the perfect one to pair with your new setup, See my full guide here → Best Carpets at Amazon to Transform Your Home